
Ever wondered how the top tech companies deploy their applications so seamlessly? It all starts with an efficient CI/CD pipeline, the assembly line of the software world. In today’s fast-paced software development environment, mastering this process is crucial for delivering high-quality applications. But there’s another piece to the puzzle: ‘infrastructure as code.’ Imagine being able to write, test, and deploy your entire infrastructure using code! Sounds intriguing?
In this blog post, we will explore how to build a CI/CD pipeline for a serverless express.js backend application using AWS CDK (Cloud Development Kit). By using serverless architecture, you’ll not only streamline your development but also significantly reduce operating costs. By the end of this post, you’ll have a
- full CI/CD pipeline
- staging and production environment
- serverless-express lambda function
- error alarm with pipeline rollback functionality
Table of Contents
- Prerequisites
- High Level Architecture
- Serverless Express
- Backend Pipeline Stack CDK
- Lambda Construct
- Service API Stack
- Deploying the project
Prerequisites:
- Understanding of Express.js
- Basic understanding of AWS CDK
- Docker installed
Complete code can be found here:
GitHub - ColeMurray/serverless-express-lambda-cdk: An express serverless lambda project deployed…Glossary
- CI/CD Pipeline: Continuous Integration and Continuous Deployment/Delivery. It’s an automated process that allows code changes to be automatically built, tested, and deployed to production environments. This practice enhances software development speed, quality, and reliability.
- AWS CDK (Amazon Web Services Cloud Development Kit): A software development framework used to define cloud infrastructure as code (IAC) and provision it through AWS CloudFormation. The CDK allows developers to define resources using familiar programming languages such as Python, TypeScript, and Java, enabling more reusable and modular cloud service deployments.
- Express.js: A fast, unopinionated, minimalist web framework for Node.js, designed to simplify the process of building web applications and APIs. It provides a robust set of features for web and mobile applications, including routing, middleware support, and template engines, allowing for rapid development and deployment.
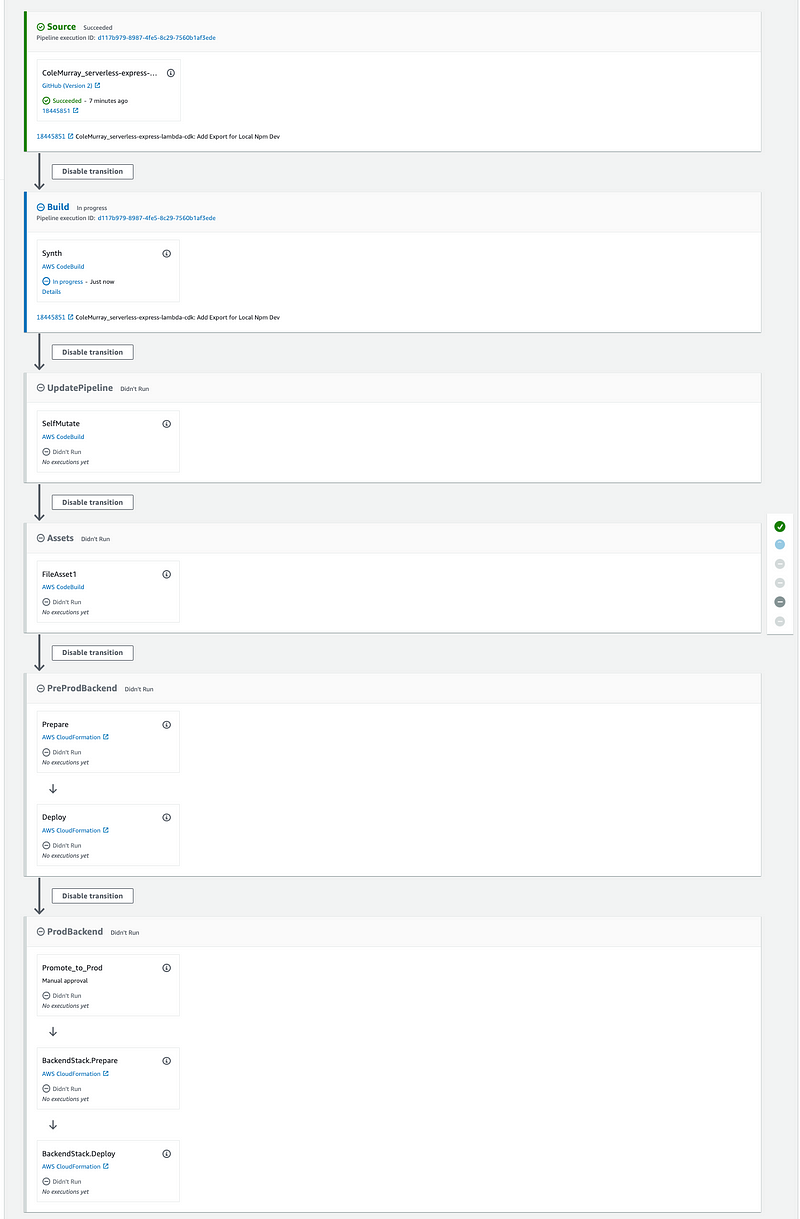
High-Level Architecture
Deployment Pipeline
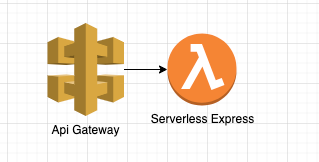
Application Architecture
Serverless Express
Serverless Express is a powerful solution that allows developers to run REST APIs and other web applications using popular Node.js application frameworks such as Express, Koa, Hapi, Sails, and more. The beauty of Serverless Express lies in its ability to host these applications on scalable and cost-effective platforms like AWS Lambda and Amazon API Gateway or Azure Function while being able to use express.js for local development.
In this code block, we are setting up a serverless Express.js application using the @vendia/serverless-express package, which enables you to run your Express app on AWS Lambda and API Gateway.
import serverlessExpress from '@vendia/serverless-express';
import {app} from './app';

let serverlessExpressInstance: any;

async function setup (event: any, context: any) {
  serverlessExpressInstance = serverlessExpress({ app })
  return serverlessExpressInstance(event, context)
}

export function handler (event: any, context: any) {
  if (serverlessExpressInstance) return serverlessExpressInstance(event, context)

  return setup(event, context)
}
Here, we define our express middleware, as well as our api routes.
import express from "express";
import cors from "cors";
import apiRoutes from "./api";
import {errorResponder} from "./middleware/errorResponder";

export const app = express();

app.use(cors({origin: '*'}));
app.use(express.json());
app.use(express.urlencoded({extended: true}))
app.use('/api/v1', apiRoutes);
app.use(errorResponder);
Class Definition: BackendPipelineStack
import {BackendServiceStage} from "./stage";
import {ComputeType} from "aws-cdk-lib/aws-codebuild";
import {CodeBuildStep, CodePipeline, CodePipelineSource, ManualApprovalStep} from "aws-cdk-lib/pipelines";
import {PolicyStatement} from "aws-cdk-lib/aws-iam";
import {Stack, StackProps} from "aws-cdk-lib";
import {Construct} from "constructs";

interface PipelineStackProps extends StackProps {
  repoName: string,
  branch: string,
  connectionArn: string,
  preprodAccount: {account: string, region: string},
  prodAccount: {account: string, region: string},
  crossEnvDeployment?: boolean
}

export class BackendPipelineStack extends Stack {

  constructor(scope: Construct, id: string, props: PipelineStackProps) {
    super(scope, id, props);

    let source = CodePipelineSource.connection(props.repoName, props.branch, {
      connectionArn: props.connectionArn
    });

    const synth = new CodeBuildStep('Synth', {
      input: source,
      commands: [
        'cd deployment/',
        'npm ci',
        'npm run build',
        'npx cdk synth'
      ],
      primaryOutputDirectory: 'deployment/cdk.out',
    });


    const pipeline = new CodePipeline(this, 'pipeline', {
      crossAccountKeys: props.crossEnvDeployment ?? false,
      synth: synth,
      selfMutation: true,
      codeBuildDefaults: {
        buildEnvironment: {
          privileged: true,
          computeType: ComputeType.MEDIUM
        },
        rolePolicy: [new PolicyStatement({
          resources: ["*"],
          actions: ["secretsmanager:GetSecretValue"]
        })]
      }
    });

    const preprod = new BackendServiceStage(this, 'PreProdBackend', {
      envVars: {}
    });

    pipeline.addStage(preprod);

    const prod = new BackendServiceStage(this, 'ProdBackend', {
      env: props.prodAccount,
    });

    pipeline.addStage(prod, {
      pre: [
        new ManualApprovalStep("Promote to Prod")
      ]
    });
  }
}
The BackendPipelineStack class extends the CDK's Stack class, enabling the orchestration of various AWS resources.
Properties
The class accepts properties defined in the PipelineStackProps interface:
- Repo Name: The repository name for your backend code.
- Branch: The branch to pull the code from.
- Connection ARN: Amazon Resource Name for the connection.
- Pre-Prod and Prod Accounts: Account and region details for pre-production and production environments.
- Cross Environment Deployment: Optional flag for enabling cross-account keys.
Source Configuration
First, a CodePipelineSource is created by specifying the repository name, branch, and connection ARN. This source configures the origin of the code that will be built and deployed.
You can create a connection within code pipeline here:
https://us-west-2.console.aws.amazon.com/codesuite/settings/connections/create?origin=settings&region=us-west-2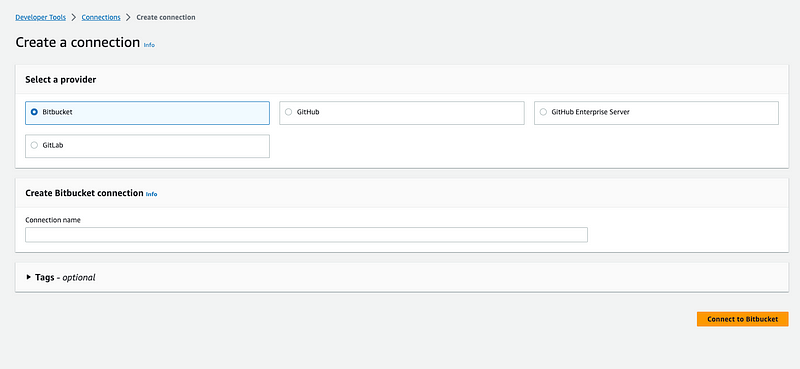
Synthesis Step
The synthesis (synth) step is responsible for building the application. In this code, it involves the following commands:
- Navigating to the deployment directory.
-
Installing dependencies using
npm ci. -
Building the project with
npm run build. -
Synthesizing the CDK resources using
npx cdk synth.
Pipeline Creation
A CodePipeline is created to orchestrate the build and deployment:
- Cross Account Keys: Allows or restricts cross-account access.
- Synthesis Step: The aforementioned synthesis step.
- Self Mutation: If set to true, the pipeline will automatically update itself when changes are made to its definition.
- CodeBuild Defaults: Specifies the environment and policies for the build process.
Staging
The pipeline is divided into stages, including pre-production (preprod) and production (prod). These stages are created using the BackendServiceStage class, which encapsulates the logic for deploying the backend services.
- Pre-Production Stage: This stage is added to the pipeline without any prerequisites.
- Production Stage: Before deploying to production, a manual approval step is included. This ensures that changes are reviewed before being promoted to the production environment.
Lambda Construct
import {DockerImage, Duration} from 'aws-cdk-lib';
import {Alarm, Metric} from 'aws-cdk-lib/aws-cloudwatch';
import {LambdaDeploymentConfig, LambdaDeploymentGroup} from 'aws-cdk-lib/aws-codedeploy';
import {Alias, AssetCode, Function, IFunction, Runtime} from 'aws-cdk-lib/aws-lambda';
import {Construct} from 'constructs';

export interface ApprovedLambdaProps {
  readonly alarmThreshold?: number;
  readonly alarmEvaluationPeriod?: number;
  readonly codeDir: string;
  readonly bundleCommand?: string[];
  readonly bundleEnvironment?: Record<string, string>;
  readonly description: string;
  readonly handler: string;
  readonly image?: DockerImage;
  readonly memorySize?: number;
  readonly runtimeDuration?: Duration;
  readonly runtimeEnvironment?: Record<string, string>;
}

export interface ApprovedNodeLambdaProps extends ApprovedLambdaProps {
}

export class ApprovedNodeLambda extends Construct {
  readonly alarm: Alarm;
  readonly lambda: IFunction;
  readonly deploymentGroup: LambdaDeploymentGroup;

  constructor(scope: Construct, id: string, props: ApprovedNodeLambdaProps) {
    super(scope, id);

    const codeAsset = AssetCode.fromAsset(props.codeDir, {
      bundling: {
        image: Runtime.NODEJS_18_X.bundlingImage,
        command: props.bundleCommand ?? [
          'bash', '-c', `
        npm install &&
        npm run build &&
        cp -au node_modules /asset-output &&
        cp -au build/* /asset-output
        `,
        ],
        environment: props.bundleEnvironment,
      },
    });

    const task = new Function(this, 'function', {
      runtime: Runtime.NODEJS_18_X,
      timeout: props.runtimeDuration ?? Duration.minutes(1),
      description: props.description,
      handler: props.handler,
      code: codeAsset,
      memorySize: props.memorySize ?? 2048,
      environment: props.runtimeEnvironment ?? {}
    });

    this.lambda = task;

    const funcErrorMetric = new Metric({
      metricName: 'Errors',
      namespace: 'AWS/Lambda',
      dimensionsMap: {
        FunctionName: task.functionName,
      },
      statistic: 'Sum',
      period: Duration.minutes(1),
    });

    this.alarm = new Alarm(this, 'RollbackAlarm', {
      metric: funcErrorMetric,
      threshold: props.alarmThreshold ?? 1,
      evaluationPeriods: props.alarmEvaluationPeriod ?? 1,
    });

    const alias = new Alias(this, 'x', {
      aliasName: 'Current',
      version: task.currentVersion,
    });

    this.deploymentGroup = new LambdaDeploymentGroup(this, 'DeploymentGroup', {
      alias,
      deploymentConfig: LambdaDeploymentConfig.LINEAR_10PERCENT_EVERY_1MINUTE,
      alarms: [this.alarm],
    });
  }
}
AWS CDK provides a powerful way to encapsulate complex constructs, allowing developers to build reusable modules. This construct represents an AWS Lambda function that’s ready for deployment, along with some error monitoring and deployment strategies.
Here’s a deep dive into what this construct does:
Properties
The ApprovedNodeLambda construct accepts properties defined in the ApprovedNodeLambdaProps interface, such as:
- Alarm Threshold: Defines a threshold of errors for triggering an alarm.
- Code Directory: The directory containing the source code.
- Build Commands: Optional build commands and environment for the Lambda function.
- Runtime Settings: These include the memory size, runtime duration, and environment variables.
Code Asset Definition
First, the construct defines an asset code by reading from the provided code directory and bundling it using a Docker image for Node.js 18.x. The code asset includes commands for installing dependencies, running a build, and copying the necessary files.
Lambda Function Definition
A Lambda function is created with the following properties:
- Runtime: It uses Node.js 18.x.
- Timeout: A timeout period for execution, with a default value of 1 minute.
- Memory Size: The amount of memory available for the function, defaulting to 2048 MB.
- Environment Variables: Optional environment variables to pass to the runtime.
Error Metrics and Alarm
The construct sets up a CloudWatch metric to monitor the ‘Errors’ metric for the Lambda function. An alarm is also created based on this metric, with a configurable threshold and evaluation period. If the error count surpasses the threshold, the alarm is triggered.
Lambda Deployment Group
Finally, an alias named ‘Current’ is created to represent the current version of the Lambda function. A LambdaDeploymentGroup is defined with this alias, setting up a linear deployment strategy that deploys 10% of the changes every minute. The alarm previously created is also associated with this deployment group.
Service Stack: Constructing the API Gateway
import {Stack, StackProps} from "aws-cdk-lib";
import {Construct} from "constructs";
import {ApprovedNodeLambda} from "./constructs/approvedNodeLambdaConstruct";
import {Cors, LambdaIntegration, RestApi} from "aws-cdk-lib/aws-apigateway";

export interface DeploymentStackProps extends StackProps {
  envVars?: Record<string, string>,
}

export class DeploymentStack extends Stack {
  constructor(scope: Construct, id: string, props: DeploymentStackProps) {
    super(scope, id, props);

    const serverFunction = new ApprovedNodeLambda(this, 'backend-server', {
      codeDir: '../source/',
      description: 'backend server lambda function',
      handler: 'src/lambdaServer.handler',
      runtimeEnvironment: props.envVars ?? {}
    });

    const api = new RestApi(this, 'api', {
      restApiName: 'BackendApi',
      description: 'Api gateway for backend api',
      binaryMediaTypes: ['*/*']
    });

    api.root.addProxy({
      defaultCorsPreflightOptions: {
        allowOrigins: Cors.ALL_ORIGINS,
        allowMethods: Cors.ALL_METHODS,
      },
      defaultIntegration: new LambdaIntegration(serverFunction.lambda, {
        proxy: true
      }),

    });
  }
}
The DeploymentStack class is responsible for deploying the backend server, Lambda function, and defining the API Gateway's characteristics. Here's a walkthrough:
Lambda Function Definition
First, an instance of ApprovedNodeLambda is created to define the backend server Lambda function. This is where we specify the code directory, handler, and runtime environment.
    const serverFunction = new ApprovedNodeLambda(this, 'backend-server', {
      codeDir: '../source/',
      description: 'backend server lambda function',
      handler: 'src/lambdaServer.handler',
      runtimeEnvironment: props.envVars ?? {}
    });
API Gateway Definition
Next, we create an API Gateway, giving it a name and description. The binaryMediaTypes property is defined to accept all media types.
    const api = new RestApi(this, 'api', {
      restApiName: 'BackendApi',
      description: 'Api gateway for backend api',
      binaryMediaTypes: ['*/*']
    });
CORS Configuration and Integration
Finally, we configure the CORS policy and set the Lambda integration with the API root. This defines how the backend should interact with requests from different origins.
Backend Service Stage: Organizing Deployment Stages
import {Stage, StageProps} from "aws-cdk-lib";
import {Construct} from "constructs";
import {DeploymentStack} from "./stack";

interface BackendServiceStageProps extends StageProps {
  envVars?: Record<string, string>,

}

export class BackendServiceStage extends Stage {

  constructor(scope: Construct, id: string, props: BackendServiceStageProps) {
    super(scope, id, props);

    new DeploymentStack(this, 'BackendStack', {
    });
  }

}
The BackendServiceStage class represents a specific stage of deployment. It is used to define various deployment environments, such as development, testing, or production as well as other stacks that should deployed as part of this stage.
Deploying the Project
Update the configuration file
    export const config = {
      codeRepository: "<YourCode/repo>,
      codeBranch: <BRANCH>",
      connectionArn: "arn:aws:codestar-connections:us-west-2:<ACCOUNT_ID>:connection/<CONNECTION_ID>",
      preprodAccount: {
        account: "<ACCOUNT_ID>",
        region: "<REGION_NAME>"
      },
      prodAccount: {
        account: "<ACCOUNT_ID>",
        region: "<REGION_NAME>"
      },
      crossEnvDeployqment: false
    }
To deploy the project, run the aws-cdk command
    npm install
    npx cdk deploy
After the deployment completes, you can view your pipeline. You may need to update the below url specific to your AWS region
https://us-west-2.console.aws.amazon.com/codesuite/codepipeline/pipelines?region=us-west-2Complete code can be found here
serverless-express-lambda-cdk/deployment at main · ColeMurray/serverless-express-lambda-cdkConclusion
By leveraging AWS CDK, we have successfully built a CI/CD pipeline for our backend application. This pipeline automatically triggers whenever changes are made to the repository, builds the application, and deploys it to both pre-production and production environments. With the ability to define infrastructure as code, we can easily manage and scale our backend application with confidence.
AWS CDK provides a powerful and flexible way to define and manage cloud resources, making it an excellent choice for building CI/CD pipelines. By automating the deployment process, we can reduce manual errors, increase efficiency, and deliver high-quality applications to our users.
Get an email whenever Cole Murray publishes.By Cole Murray on September 4, 2023.