
In my last tutorial , you learned about convolutional neural networks and the theory behind them. In this tutorial, you’ll learn how to use a convolutional neural network to perform facial recognition using Tensorflow, Dlib, and Docker.
Overview
- Introduction to Facial Recognition
- Preprocessing Images using Facial Detection and Alignment
- Generating Facial Embeddings in Tensorflow
- Training an SVM Classifier
Prerequisites
- Basic understanding of Linear Algebra
- Basic understanding of Convolutional Neural Networks
- Basic Tensorflow understanding
Introduction to Facial Recognition Systems
Facial recognition is a biometric solution that measures unique characteristics about one’s face. Applications available today include flight checkin, tagging friends and family members in photos, and “tailored” advertising.
To perform facial recognition, you’ll need a way to uniquely represent a face. In 1960, Woodrow Bledsoe used a technique involving marking the coordinates of prominent features of a face. Among these features were the location of hairline, eyes and nose.
In 2015, researchers from Google released a paper, FaceNet, which uses a convolutional neural network relying on the image pixels as the features, rather than extracting them manually. It achieved a new record accuracy of 99.63% on the LFW dataset.
FaceNet: In the FaceNet paper, a convolutional neural network architecture is proposed. For a loss function, FaceNet uses “triplet loss”. Triplet loss relies on minimizing the distance from positive examples, while maximizing the distance from negative examples.

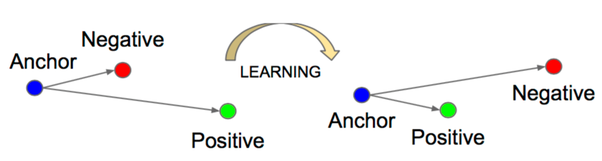
Conceptually, this makes sense. Faces of the same identity should appear closer to each other than faces of another identity.
Vector Embeddings: For this tutorial, the important take away from the paper is the idea of representing a face as a 128-dimensional embedding. An embedding is the collective name for mapping input features to vectors. In a facial recognition system, these inputs are images containing a subject’s face, mapped to a numerical vector representation.
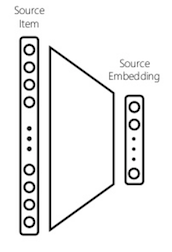
Since these vector embeddings are represented in shared vector space, vector distance can be used to calculate the similarity between two vectors. In a facial recognition context, this can vector distance be applied to calculate how similar two faces are. Additionally, these embeddings can be used as feature inputs into a classification, clustering, or regression task.
Preprocessing Data using Dlib and Docker
    # Project Structure

    ├── Dockerfile
    ├── etc
    │ ├── 20170511–185253
    │ │ ├── 20170511–185253.pb
    ├── data
    ├── medium_facenet_tutorial
    │ ├── align_dlib.py
    │ ├── download_and_extract_model.py
    │ ├── __init__.py
    │ ├── lfw_input.py
    │ ├── preprocess.py
    │ ├── shape_predictor_68_face_landmarks.dat
    │ └── train_classifier.py
    ├── requirements.txt
Preparing the Data
You’ll use the LFW (Labeled Faces in the Wild) dataset as training data. The directory is structured as seen below. You can replace this with your dataset by following the same structure.
    # Download lfw dataset
    $ curl -O http://vis-www.cs.umass.edu/lfw/lfw.tgz # 177MB
    $ tar -xzvf lfw.tgz

    # Directory Structure
    # ├── Tyra_Banks
    # │ ├── Tyra_Banks_0001.jpg
    # │ └── Tyra_Banks_0002.jpg
    # ├── Tyron_Garner
    # │ ├── Tyron_Garner_0001.jpg
    # │ └── Tyron_Garner_0002.jpg
Preprocessing
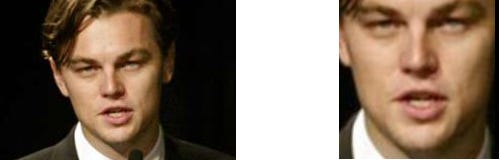
Below, you’ll pre-process the images before passing them into the FaceNet model. Image pre-processing in a facial recognition context typically solves a few problems. These problems range from lighting differences, occlusion, alignment, segmentation. Below, you’ll address segmentation and alignment.
First, you’ll solve the segmentation problem by finding the largest face in an image. This is useful as our training data does not have to be cropped for a face ahead of time.
Second, you’ll solve alignment. In photographs, it is common for a face to not be perfectly center aligned with the image. To standardize input, you’ll apply a transform to center all images based on the location of eyes and bottom lip.
Environment Setup
Here, you’ll use docker to install tensorflow, opencv, and Dlib. Dlib provides a library that can be used for facial detection and alignment. These libraries can be a bit difficult to install, so you’ll use Docker for the install.
Docker is a container platform that simplifies deployment. It solves the problem of installing software dependencies onto different server environments. If you are new to docker, you can read more here. To install docker, run
curl https://get.docker.com | shAfter installing docker, you’ll create two files. A requirements.txt for the python dependencies and a Dockerfile to create your docker environment.
tensorflow==1.1.0
scikit-learn==0.18.2
scipy==0.19.1
numpy==1.13.1
requests==2.18.3
requirements.txt
FROM tensorflow/tensorflow:latest

RUN apt-get update -y --fix-missing
RUN apt-get install -y ffmpeg
RUN apt-get install -y build-essential cmake pkg-config \
                    libjpeg8-dev libtiff5-dev libjasper-dev libpng12-dev \
                    libavcodec-dev libavformat-dev libswscale-dev libv4l-dev \
                    libxvidcore-dev libx264-dev \
                    libgtk-3-dev \
                    libatlas-base-dev gfortran \
                    libboost-all-dev \
                    python3 python3-dev python3-numpy

RUN apt-get install -y wget vim python3-tk python3-pip

WORKDIR /
RUN wget -O opencv.zip https://github.com/Itseez/opencv/archive/3.2.0.zip \
    && unzip opencv.zip \
    && wget -O opencv_contrib.zip https://github.com/Itseez/opencv_contrib/archive/3.2.0.zip \
    && unzip opencv_contrib.zip

# install opencv3.2
RUN cd /opencv-3.2.0/ \
   && mkdir build \
   && cd build \
   && cmake -D CMAKE_BUILD_TYPE=RELEASE \
            -D INSTALL_C_EXAMPLES=OFF \
            -D INSTALL_PYTHON_EXAMPLES=ON \
            -D OPENCV_EXTRA_MODULES_PATH=/opencv_contrib-3.2.0/modules \
            -D BUILD_EXAMPLES=OFF \
            -D BUILD_opencv_python2=OFF \
            -D BUILD_NEW_PYTHON_SUPPORT=ON \
            -D CMAKE_INSTALL_PREFIX=$(python3 -c "import sys; print(sys.prefix)") \
            -D PYTHON_EXECUTABLE=$(which python3) \
            -D WITH_FFMPEG=1 \
            -D WITH_CUDA=0 \
            .. \
    && make -j8 \
    && make install \
    && ldconfig \
    && rm /opencv.zip \
    && rm /opencv_contrib.zip


# Install dlib 19.4
RUN wget -O dlib-19.4.tar.bz2 http://dlib.net/files/dlib-19.4.tar.bz2 \
    && tar -vxjf dlib-19.4.tar.bz2

RUN cd dlib-19.4 \
    && cd examples \
    && mkdir build \
    && cd build \
    && cmake .. \
    && cmake --build . --config Release \
    && cd /dlib-19.4 \
    && pip3 install setuptools \
    && python3 setup.py install \
    && cd $WORKDIR \
    && rm /dlib-19.4.tar.bz2


ADD $PWD/requirements.txt /requirements.txt
RUN pip3 install -r /requirements.txt


CMD ["/bin/bash"]
To build this image, run:
docker build -t colemurray/medium-facenet-tutorial -f Dockerfile .

# This can take several minutes depending on your hardware
# On MBP, ~ 25mins
# Image can be pulled from dockerhub below
If you would like to avoid building from source, the image can be pulled from dockerhub using:
docker pull colemurray/medium-facenet-tutorial # Recommended

# A GPU supported environment can be found here
# nvidia-docker pull colemurray/medium-facenet-tutorial:latest-gpu
Detect, Crop & Align with Dlib
After creating your environment, you can begin preprocessing.
First download dlib’s face landmark predictor.
curl -O http://dlib.net/files/shape_predictor_68_face_landmarks.dat.bz2
bzip2 -d shape_predictor_68_face_landmarks.dat.bz2
You’ll use this face landmark predictor to find the location of the inner eyes and bottom lips of a face in an image. These coordinates will be used to center align the image.
# Copyright 2015-2016 Carnegie Mellon University
#
# Licensed under the Apache License, Version 2.0 (the "License");
# you may not use this file except in compliance with the License.
# You may obtain a copy of the License at
#
#     http://www.apache.org/licenses/LICENSE-2.0
#
# Unless required by applicable law or agreed to in writing, software
# distributed under the License is distributed on an "AS IS" BASIS,
# WITHOUT WARRANTIES OR CONDITIONS OF ANY KIND, either express or implied.
# See the License for the specific language governing permissions and
# limitations under the License.

"""Module for dlib-based alignment."""

# NOTE: This file has been copied from the openface project.
#  https://github.com/cmusatyalab/openface/blob/master/openface/align_dlib.py

import cv2
import dlib
import numpy as np

TEMPLATE = np.float32([
    (0.0792396913815, 0.339223741112), (0.0829219487236, 0.456955367943),
    (0.0967927109165, 0.575648016728), (0.122141515615, 0.691921601066),
    (0.168687863544, 0.800341263616), (0.239789390707, 0.895732504778),
    (0.325662452515, 0.977068762493), (0.422318282013, 1.04329000149),
    (0.531777802068, 1.06080371126), (0.641296298053, 1.03981924107),
    (0.738105872266, 0.972268833998), (0.824444363295, 0.889624082279),
    (0.894792677532, 0.792494155836), (0.939395486253, 0.681546643421),
    (0.96111933829, 0.562238253072), (0.970579841181, 0.441758925744),
    (0.971193274221, 0.322118743967), (0.163846223133, 0.249151738053),
    (0.21780354657, 0.204255863861), (0.291299351124, 0.192367318323),
    (0.367460241458, 0.203582210627), (0.4392945113, 0.233135599851),
    (0.586445962425, 0.228141644834), (0.660152671635, 0.195923841854),
    (0.737466449096, 0.182360984545), (0.813236546239, 0.192828009114),
    (0.8707571886, 0.235293377042), (0.51534533827, 0.31863546193),
    (0.516221448289, 0.396200446263), (0.517118861835, 0.473797687758),
    (0.51816430343, 0.553157797772), (0.433701156035, 0.604054457668),
    (0.475501237769, 0.62076344024), (0.520712933176, 0.634268222208),
    (0.565874114041, 0.618796581487), (0.607054002672, 0.60157671656),
    (0.252418718401, 0.331052263829), (0.298663015648, 0.302646354002),
    (0.355749724218, 0.303020650651), (0.403718978315, 0.33867711083),
    (0.352507175597, 0.349987615384), (0.296791759886, 0.350478978225),
    (0.631326076346, 0.334136672344), (0.679073381078, 0.29645404267),
    (0.73597236153, 0.294721285802), (0.782865376271, 0.321305281656),
    (0.740312274764, 0.341849376713), (0.68499850091, 0.343734332172),
    (0.353167761422, 0.746189164237), (0.414587777921, 0.719053835073),
    (0.477677654595, 0.706835892494), (0.522732900812, 0.717092275768),
    (0.569832064287, 0.705414478982), (0.635195811927, 0.71565572516),
    (0.69951672331, 0.739419187253), (0.639447159575, 0.805236879972),
    (0.576410514055, 0.835436670169), (0.525398405766, 0.841706377792),
    (0.47641545769, 0.837505914975), (0.41379548902, 0.810045601727),
    (0.380084785646, 0.749979603086), (0.477955996282, 0.74513234612),
    (0.523389793327, 0.748924302636), (0.571057789237, 0.74332894691),
    (0.672409137852, 0.744177032192), (0.572539621444, 0.776609286626),
    (0.5240106503, 0.783370783245), (0.477561227414, 0.778476346951)])

INV_TEMPLATE = np.float32([
    (-0.04099179660567834, -0.008425234314031194, 2.575498465013183),
    (0.04062510634554352, -0.009678089746831375, -1.2534351452524177),
    (0.0003666902601348179, 0.01810332406086298, -0.32206331976076663)])

TPL_MIN, TPL_MAX = np.min(TEMPLATE, axis=0), np.max(TEMPLATE, axis=0)
MINMAX_TEMPLATE = (TEMPLATE - TPL_MIN) / (TPL_MAX - TPL_MIN)


class AlignDlib:
    """
    Use `dlib's landmark estimation <http://blog.dlib.net/2014/08/real-time-face-pose-estimation.html>`_ to align faces.
    The alignment preprocess faces for input into a neural network.
    Faces are resized to the same size (such as 96x96) and transformed
    to make landmarks (such as the eyes and nose) appear at the same
    location on every image.
    Normalized landmarks:
    .. image:: ../images/dlib-landmark-mean.png
    """

    #: Landmark indices corresponding to the inner eyes and bottom lip.
    INNER_EYES_AND_BOTTOM_LIP = [39, 42, 57]

    #: Landmark indices corresponding to the outer eyes and nose.
    OUTER_EYES_AND_NOSE = [36, 45, 33]

    def __init__(self, facePredictor):
        """
        Instantiate an 'AlignDlib' object.
        :param facePredictor: The path to dlib's
        :type facePredictor: str
        """
        assert facePredictor is not None

        # pylint: disable=no-member
        self.detector = dlib.get_frontal_face_detector()
        self.predictor = dlib.shape_predictor(facePredictor)

    def getAllFaceBoundingBoxes(self, rgbImg):
        """
        Find all face bounding boxes in an image.
        :param rgbImg: RGB image to process. Shape: (height, width, 3)
        :type rgbImg: numpy.ndarray
        :return: All face bounding boxes in an image.
        :rtype: dlib.rectangles
        """
        assert rgbImg is not None

        try:
            return self.detector(rgbImg, 1)
        except Exception as e:  # pylint: disable=broad-except
            print("Warning: {}".format(e))
            # In rare cases, exceptions are thrown.
            return []

    def getLargestFaceBoundingBox(self, rgbImg, skipMulti=False):
        """
        Find the largest face bounding box in an image.
        :param rgbImg: RGB image to process. Shape: (height, width, 3)
        :type rgbImg: numpy.ndarray
        :param skipMulti: Skip image if more than one face detected.
        :type skipMulti: bool
        :return: The largest face bounding box in an image, or None.
        :rtype: dlib.rectangle
        """
        assert rgbImg is not None

        faces = self.getAllFaceBoundingBoxes(rgbImg)
        if (not skipMulti and len(faces) > 0) or len(faces) == 1:
            return max(faces, key=lambda rect: rect.width() * rect.height())
        else:
            return None

    def findLandmarks(self, rgbImg, bb):
        """
        Find the landmarks of a face.
        :param rgbImg: RGB image to process. Shape: (height, width, 3)
        :type rgbImg: numpy.ndarray
        :param bb: Bounding box around the face to find landmarks for.
        :type bb: dlib.rectangle
        :return: Detected landmark locations.
        :rtype: list of (x,y) tuples
        """
        assert rgbImg is not None
        assert bb is not None

        points = self.predictor(rgbImg, bb)
        # return list(map(lambda p: (p.x, p.y), points.parts()))
        return [(p.x, p.y) for p in points.parts()]

    # pylint: disable=dangerous-default-value
    def align(self, imgDim, rgbImg, bb=None,
              landmarks=None, landmarkIndices=INNER_EYES_AND_BOTTOM_LIP,
              skipMulti=False, scale=1.0):
        r"""align(imgDim, rgbImg, bb=None, landmarks=None, landmarkIndices=INNER_EYES_AND_BOTTOM_LIP)
        Transform and align a face in an image.
        :param imgDim: The edge length in pixels of the square the image is resized to.
        :type imgDim: int
        :param rgbImg: RGB image to process. Shape: (height, width, 3)
        :type rgbImg: numpy.ndarray
        :param bb: Bounding box around the face to align. \
                   Defaults to the largest face.
        :type bb: dlib.rectangle
        :param landmarks: Detected landmark locations. \
                          Landmarks found on `bb` if not provided.
        :type landmarks: list of (x,y) tuples
        :param landmarkIndices: The indices to transform to.
        :type landmarkIndices: list of ints
        :param skipMulti: Skip image if more than one face detected.
        :type skipMulti: bool
        :param scale: Scale image before cropping to the size given by imgDim.
        :type scale: float
        :return: The aligned RGB image. Shape: (imgDim, imgDim, 3)
        :rtype: numpy.ndarray
        """
        assert imgDim is not None
        assert rgbImg is not None
        assert landmarkIndices is not None

        if bb is None:
            bb = self.getLargestFaceBoundingBox(rgbImg, skipMulti)
            if bb is None:
                return

        if landmarks is None:
            landmarks = self.findLandmarks(rgbImg, bb)

        npLandmarks = np.float32(landmarks)
        npLandmarkIndices = np.array(landmarkIndices)

        # pylint: disable=maybe-no-member
        H = cv2.getAffineTransform(npLandmarks[npLandmarkIndices],
                                   imgDim * MINMAX_TEMPLATE[npLandmarkIndices] * scale + imgDim * (1 - scale) / 2)
        thumbnail = cv2.warpAffine(rgbImg, H, (imgDim, imgDim))

        return thumbnail
align_dlib.py
This file, sourced from CMU, provides methods for detecting a face in an image, finding facial landmarks, and alignment given these landmarks.
Next, you’ll create a preprocessor for your dataset. This file will read each image into memory, attempt to find the largest face, center align, and write the file to output. If a face cannot be found in the image, logging will be displayed to console with the filename.
As each image can be processed independently, python’s multiprocessing is used to process an image on each available cpu core.
import argparse
import glob
import logging
import multiprocessing as mp
import os
import time

import cv2

from medium_facenet_tutorial.align_dlib import AlignDlib

logger = logging.getLogger(__name__)

align_dlib = AlignDlib(os.path.join(os.path.dirname(__file__), 'shape_predictor_68_face_landmarks.dat'))


def main(input_dir, output_dir, crop_dim):
    start_time = time.time()
    pool = mp.Pool(processes=mp.cpu_count())

    if not os.path.exists(output_dir):
        os.makedirs(output_dir)

    for image_dir in os.listdir(input_dir):
        image_output_dir = os.path.join(output_dir, os.path.basename(os.path.basename(image_dir)))
        if not os.path.exists(image_output_dir):
            os.makedirs(image_output_dir)

    image_paths = glob.glob(os.path.join(input_dir, '**/*.jpg'))
    for index, image_path in enumerate(image_paths):
        image_output_dir = os.path.join(output_dir, os.path.basename(os.path.dirname(image_path)))
        output_path = os.path.join(image_output_dir, os.path.basename(image_path))
        pool.apply_async(preprocess_image, (image_path, output_path, crop_dim))

    pool.close()
    pool.join()
    logger.info('Completed in {} seconds'.format(time.time() - start_time))


def preprocess_image(input_path, output_path, crop_dim):
    """
    Detect face, align and crop :param input_path. Write output to :param output_path
    :param input_path: Path to input image
    :param output_path: Path to write processed image
    :param crop_dim: dimensions to crop image to
    """
    image = _process_image(input_path, crop_dim)
    if image is not None:
        logger.debug('Writing processed file: {}'.format(output_path))
        cv2.imwrite(output_path, image)
    else:
        logger.warning("Skipping filename: {}".format(input_path))


def _process_image(filename, crop_dim):
    image = None
    aligned_image = None

    image = _buffer_image(filename)

    if image is not None:
        aligned_image = _align_image(image, crop_dim)
    else:
        raise IOError('Error buffering image: {}'.format(filename))

    return aligned_image


def _buffer_image(filename):
    logger.debug('Reading image: {}'.format(filename))
    image = cv2.imread(filename, )
    image = cv2.cvtColor(image, cv2.COLOR_BGR2RGB)
    return image


def _align_image(image, crop_dim):
    bb = align_dlib.getLargestFaceBoundingBox(image)
    aligned = align_dlib.align(crop_dim, image, bb, landmarkIndices=AlignDlib.INNER_EYES_AND_BOTTOM_LIP)
    if aligned is not None:
        aligned = cv2.cvtColor(aligned, cv2.COLOR_BGR2RGB)
    return aligned


if __name__ == '__main__':
    logging.basicConfig(level=logging.INFO)
    parser = argparse.ArgumentParser(add_help=True)
    parser.add_argument('--input-dir', type=str, action='store', default='data', dest='input_dir')
    parser.add_argument('--output-dir', type=str, action='store', default='output', dest='output_dir')
    parser.add_argument('--crop-dim', type=int, action='store', default=180, dest='crop_dim',
                        help='Size to crop images to')

    args = parser.parse_args()

    main(args.input_dir, args.output_dir, args.crop_dim)
Getting Results
Now that you’ve created a pipeline, time to get results. As the script supports parallelism, you will see increased performance by running with multiple cores. You’ll need to run the preprocessor in the docker environment to have access to the installed libraries.
Below, you’ll mount your project directory as a volume inside the docker container and run the preprocessing script on your input data. The results will be written to a directory specified with command line arguments.
docker run -v $PWD:/medium-facenet-tutorial \
-e PYTHONPATH=$PYTHONPATH:/medium-facenet-tutorial \
-it colemurray/medium-facenet-tutorial python3 /medium-facenet-tutorial/medium_facenet_tutorial/preprocess.py \
--input-dir /medium-facenet-tutorial/data \
--output-dir /medium-facenet-tutorial/output/intermediate \
--crop-dim 180
Code up to this point can be found here
Review
Using Dlib, you detected the largest face in an image and aligned the center of the face by the inner eyes and bottom lip. This alignment is a method for standardizing each image for use as feature input.
Creating Embeddings in Tensorflow
Now that you’ve preprocessed the data, you’ll generate vector embeddings of each identity. These embeddings can then be used as input to a classification, regression or clustering task.
Download Weights
You’ll use the Inception Resnet V1 as your convolutional neural network. First, create a file to download the weights to the model.
By using pre-trained weights, you are able to apply transfer learning to a new dataset, in this tutorial the LFW dataset:
import argparse

import logging
import os
import requests
import zipfile

"""
This file is copied from:
https://github.com/davidsandberg/facenet/blob/master/src/download_and_extract_model.py
"""

model_dict = {
    '20170511-185253': '0B5MzpY9kBtDVOTVnU3NIaUdySFE'
}


def download_and_extract_model(model_name, data_dir):
    if not os.path.exists(data_dir):
        os.makedirs(data_dir)

    file_id = model_dict[model_name]
    destination = os.path.join(data_dir, model_name + '.zip')
    if not os.path.exists(destination):
        print('Downloading model to %s' % destination)
        download_file_from_google_drive(file_id, destination)
        with zipfile.ZipFile(destination, 'r') as zip_ref:
            print('Extracting model to %s' % data_dir)
            zip_ref.extractall(data_dir)


def download_file_from_google_drive(file_id, destination):
    URL = "https://drive.google.com/uc?export=download"

    session = requests.Session()

    response = session.get(URL, params={'id': file_id}, stream=True)
    token = get_confirm_token(response)

    if token:
        params = {'id': file_id, 'confirm': token}
        response = session.get(URL, params=params, stream=True)

    save_response_content(response, destination)


def get_confirm_token(response):
    for key, value in response.cookies.items():
        if key.startswith('download_warning'):
            return value

    return None


def save_response_content(response, destination):
    CHUNK_SIZE = 32768

    with open(destination, "wb") as f:
        for chunk in response.iter_content(CHUNK_SIZE):
            if chunk:  # filter out keep-alive new chunks
                f.write(chunk)


if __name__ == '__main__':
    logging.basicConfig(level=logging.DEBUG)
    parser = argparse.ArgumentParser(add_help=True)
    parser.add_argument('--model-dir', type=str, action='store', dest='model_dir',
                        help='Path to model protobuf graph')

    args = parser.parse_args()

    download_and_extract_model('20170511-185253', args.model_dir)
download_and_extract_model.py
docker run -v $PWD:/medium-facenet-tutorial \
-e PYTHONPATH=$PYTHONPATH:/medium-facenet-tutorial \
-it colemurray/medium-facenet-tutorial python3 /medium-facenet-tutorial/medium_facenet_tutorial/download_and_extract_model.py \
--model-dir /medium-facenet-tutorial/etc
Load Embeddings
Below, you’ll utilize Tensorflow’s queue api to load the preprocessed images in parallel. By using queues, images can be loaded in parallel using multi-threading. When using a GPU, this allows image preprocessing to be performed on CPU, while matrix multiplication is performed on GPU.
import logging
import os

import numpy as np
import tensorflow as tf
from tensorflow.python.framework import ops

logger = logging.getLogger(__name__)


def read_data(image_paths, label_list, image_size, batch_size, max_nrof_epochs, num_threads, shuffle, random_flip,
              random_brightness, random_contrast):
    """
    Creates Tensorflow Queue to batch load images. Applies transformations to images as they are loaded.
    :param random_brightness:
    :param random_flip:
    :param image_paths: image paths to load
    :param label_list: class labels for image paths
    :param image_size: size to resize images to
    :param batch_size: num of images to load in batch
    :param max_nrof_epochs: total number of epochs to read through image list
    :param num_threads: num threads to use
    :param shuffle: Shuffle images
    :param random_flip: Random Flip image
    :param random_brightness: Apply random brightness transform to image
    :param random_contrast: Apply random contrast transform to image
    :return: images and labels of batch_size
    """

    images = ops.convert_to_tensor(image_paths, dtype=tf.string)
    labels = ops.convert_to_tensor(label_list, dtype=tf.int32)

    # Makes an input queue
    input_queue = tf.train.slice_input_producer((images, labels),
                                                num_epochs=max_nrof_epochs, shuffle=shuffle, )

    images_labels = []
    imgs = []
    lbls = []
    for _ in range(num_threads):
        image, label = read_image_from_disk(filename_to_label_tuple=input_queue)
        image = tf.random_crop(image, size=[image_size, image_size, 3])
        image.set_shape((image_size, image_size, 3))
        image = tf.image.per_image_standardization(image)

        if random_flip:
            image = tf.image.random_flip_left_right(image)

        if random_brightness:
            image = tf.image.random_brightness(image, max_delta=0.3)

        if random_contrast:
            image = tf.image.random_contrast(image, lower=0.2, upper=1.8)

        imgs.append(image)
        lbls.append(label)
        images_labels.append([image, label])

    image_batch, label_batch = tf.train.batch_join(images_labels,
                                                   batch_size=batch_size,
                                                   capacity=4 * num_threads,
                                                   enqueue_many=False,
                                                   allow_smaller_final_batch=True)
    return image_batch, label_batch


def read_image_from_disk(filename_to_label_tuple):
    """
    Consumes input tensor and loads image
    :param filename_to_label_tuple:
    :type filename_to_label_tuple: list
    :return: tuple of image and label
    """
    label = filename_to_label_tuple[1]
    file_contents = tf.read_file(filename_to_label_tuple[0])
    example = tf.image.decode_jpeg(file_contents, channels=3)
    return example, label


def get_image_paths_and_labels(dataset):
    image_paths_flat = []
    labels_flat = []
    for i in range(int(len(dataset))):
        image_paths_flat += dataset[i].image_paths
        labels_flat += [i] * len(dataset[i].image_paths)
    return image_paths_flat, labels_flat


def get_dataset(input_directory):
    dataset = []

    classes = os.listdir(input_directory)
    classes.sort()
    nrof_classes = len(classes)
    for i in range(nrof_classes):
        class_name = classes[i]
        facedir = os.path.join(input_directory, class_name)
        if os.path.isdir(facedir):
            images = os.listdir(facedir)
            image_paths = [os.path.join(facedir, img) for img in images]
            dataset.append(ImageClass(class_name, image_paths))

    return dataset


def filter_dataset(dataset, min_images_per_label=10):
    filtered_dataset = []
    for i in range(len(dataset)):
        if len(dataset[i].image_paths) < min_images_per_label:
            logger.info('Skipping class: {}'.format(dataset[i].name))
            continue
        else:
            filtered_dataset.append(dataset[i])
    return filtered_dataset


def split_dataset(dataset, split_ratio=0.8):
    train_set = []
    test_set = []
    min_nrof_images = 2
    for cls in dataset:
        paths = cls.image_paths
        np.random.shuffle(paths)
        split = int(round(len(paths) * split_ratio))
        if split < min_nrof_images:
            continue  # Not enough images for test set. Skip class...
        train_set.append(ImageClass(cls.name, paths[0:split]))
        test_set.append(ImageClass(cls.name, paths[split:-1]))
    return train_set, test_set


class ImageClass():
    def __init__(self, name, image_paths):
        self.name = name
        self.image_paths = image_paths

    def __str__(self):
        return self.name + ', ' + str(len(self.image_paths)) + ' images'

    def __len__(self):
        return len(self.image_paths)
lfw_input.py
Train a Classifier
With the input queue squared away, you’ll move on to creating the embeddings.
First, you’ll load the images from the queue you created. While training, you’ll apply preprocessing to the image. This preprocessing will add random transformations to the image, creating more images to train on.
These images will be fed in a batch size of 128 into the model. This model will return a 128 dimensional embedding for each image, returning a 128 x 128 matrix for each batch.
After these embeddings are created, you’ll use them as feature inputs into a scikit-learn’s SVM classifier to train on each identity. Identities with less than 10 images will be dropped. This parameter is tunable from command-line.
import argparse
import logging
import os
import pickle
import sys
import time

import numpy as np
import tensorflow as tf
from sklearn.svm import SVC
from tensorflow.python.platform import gfile

from lfw_input import filter_dataset, split_dataset, get_dataset
from medium_facenet_tutorial import lfw_input

logger = logging.getLogger(__name__)


def main(input_directory, model_path, classifier_output_path, batch_size, num_threads, num_epochs,
         min_images_per_labels, split_ratio, is_train=True):
    """
    Loads images from :param input_dir, creates embeddings using a model defined at :param model_path, and trains
     a classifier outputted to :param output_path

    :param input_directory: Path to directory containing pre-processed images
    :param model_path: Path to protobuf graph file for facenet model
    :param classifier_output_path: Path to write pickled classifier
    :param batch_size: Batch size to create embeddings
    :param num_threads: Number of threads to utilize for queuing
    :param num_epochs: Number of epochs for each image
    :param min_images_per_labels: Minimum number of images per class
    :param split_ratio: Ratio to split train/test dataset
    :param is_train: bool denoting if training or evaluate
    """

    start_time = time.time()
    with tf.Session(config=tf.ConfigProto(log_device_placement=False)) as sess:
        train_set, test_set = _get_test_and_train_set(input_directory, min_num_images_per_label=min_images_per_labels,
                                                      split_ratio=split_ratio)
        if is_train:
            images, labels, class_names = _load_images_and_labels(train_set, image_size=160, batch_size=batch_size,
                                                                  num_threads=num_threads, num_epochs=num_epochs,
                                                                  random_flip=True, random_brightness=True,
                                                                  random_contrast=True)
        else:
            images, labels, class_names = _load_images_and_labels(test_set, image_size=160, batch_size=batch_size,
                                                                  num_threads=num_threads, num_epochs=1)

        _load_model(model_filepath=model_path)

        init_op = tf.group(tf.global_variables_initializer(), tf.local_variables_initializer())
        sess.run(init_op)

        images_placeholder = tf.get_default_graph().get_tensor_by_name("input:0")
        embedding_layer = tf.get_default_graph().get_tensor_by_name("embeddings:0")
        phase_train_placeholder = tf.get_default_graph().get_tensor_by_name("phase_train:0")

        coord = tf.train.Coordinator()
        threads = tf.train.start_queue_runners(coord=coord, sess=sess)

        emb_array, label_array = _create_embeddings(embedding_layer, images, labels, images_placeholder,
                                                    phase_train_placeholder, sess)

        coord.request_stop()
        coord.join(threads=threads)
        logger.info('Created {} embeddings'.format(len(emb_array)))

        classifier_filename = classifier_output_path

        if is_train:
            _train_and_save_classifier(emb_array, label_array, class_names, classifier_filename)
        else:
            _evaluate_classifier(emb_array, label_array, classifier_filename)

        logger.info('Completed in {} seconds'.format(time.time() - start_time))


def _get_test_and_train_set(input_dir, min_num_images_per_label, split_ratio=0.7):
    """
    Load train and test dataset. Classes with < :param min_num_images_per_label will be filtered out.
    :param input_dir:
    :param min_num_images_per_label:
    :param split_ratio:
    :return:
    """
    dataset = get_dataset(input_dir)
    dataset = filter_dataset(dataset, min_images_per_label=min_num_images_per_label)
    train_set, test_set = split_dataset(dataset, split_ratio=split_ratio)

    return train_set, test_set


def _load_images_and_labels(dataset, image_size, batch_size, num_threads, num_epochs, random_flip=False,
                            random_brightness=False, random_contrast=False):
    class_names = [cls.name for cls in dataset]
    image_paths, labels = lfw_input.get_image_paths_and_labels(dataset)
    images, labels = lfw_input.read_data(image_paths, labels, image_size, batch_size, num_epochs, num_threads,
                                         shuffle=False, random_flip=random_flip, random_brightness=random_brightness,
                                         random_contrast=random_contrast)
    return images, labels, class_names


def _load_model(model_filepath):
    """
    Load frozen protobuf graph
    :param model_filepath: Path to protobuf graph
    :type model_filepath: str
    """
    model_exp = os.path.expanduser(model_filepath)
    if os.path.isfile(model_exp):
        logging.info('Model filename: %s' % model_exp)
        with gfile.FastGFile(model_exp, 'rb') as f:
            graph_def = tf.GraphDef()
            graph_def.ParseFromString(f.read())
            tf.import_graph_def(graph_def, name='')
    else:
        logger.error('Missing model file. Exiting')
        sys.exit(-1)


def _create_embeddings(embedding_layer, images, labels, images_placeholder, phase_train_placeholder, sess):
    """
    Uses model to generate embeddings from :param images.
    :param embedding_layer:
    :param images:
    :param labels:
    :param images_placeholder:
    :param phase_train_placeholder:
    :param sess:
    :return: (tuple): image embeddings and labels
    """
    emb_array = None
    label_array = None
    try:
        i = 0
        while True:
            batch_images, batch_labels = sess.run([images, labels])
            logger.info('Processing iteration {} batch of size: {}'.format(i, len(batch_labels)))
            emb = sess.run(embedding_layer,
                           feed_dict={images_placeholder: batch_images, phase_train_placeholder: False})

            emb_array = np.concatenate([emb_array, emb]) if emb_array is not None else emb
            label_array = np.concatenate([label_array, batch_labels]) if label_array is not None else batch_labels
            i += 1

    except tf.errors.OutOfRangeError:
        pass

    return emb_array, label_array


def _train_and_save_classifier(emb_array, label_array, class_names, classifier_filename_exp):
    logger.info('Training Classifier')
    model = SVC(kernel='linear', probability=True, verbose=False)
    model.fit(emb_array, label_array)

    with open(classifier_filename_exp, 'wb') as outfile:
        pickle.dump((model, class_names), outfile)
    logging.info('Saved classifier model to file "%s"' % classifier_filename_exp)


def _evaluate_classifier(emb_array, label_array, classifier_filename):
    logger.info('Evaluating classifier on {} images'.format(len(emb_array)))
    if not os.path.exists(classifier_filename):
        raise ValueError('Pickled classifier not found, have you trained first?')

    with open(classifier_filename, 'rb') as f:
        model, class_names = pickle.load(f)

        predictions = model.predict_proba(emb_array, )
        best_class_indices = np.argmax(predictions, axis=1)
        best_class_probabilities = predictions[np.arange(len(best_class_indices)), best_class_indices]

        for i in range(len(best_class_indices)):
            print('%4d  %s: %.3f' % (i, class_names[best_class_indices[i]], best_class_probabilities[i]))

        accuracy = np.mean(np.equal(best_class_indices, label_array))
        print('Accuracy: %.3f' % accuracy)


if __name__ == '__main__':
    logging.basicConfig(level=logging.INFO)
    parser = argparse.ArgumentParser(add_help=True)
    parser.add_argument('--model-path', type=str, action='store', dest='model_path',
                        help='Path to model protobuf graph')
    parser.add_argument('--input-dir', type=str, action='store', dest='input_dir',
                        help='Input path of data to train on')
    parser.add_argument('--batch-size', type=int, action='store', dest='batch_size',
                        help='Input path of data to train on', default=128)
    parser.add_argument('--num-threads', type=int, action='store', dest='num_threads', default=16,
                        help='Number of threads to utilize for queue')
    parser.add_argument('--num-epochs', type=int, action='store', dest='num_epochs', default=3,
                        help='Path to output trained classifier model')
    parser.add_argument('--split-ratio', type=float, action='store', dest='split_ratio', default=0.7,
                        help='Ratio to split train/test dataset')
    parser.add_argument('--min-num-images-per-class', type=int, action='store', default=10,
                        dest='min_images_per_class', help='Minimum number of images per class')
    parser.add_argument('--classifier-path', type=str, action='store', dest='classifier_path',
                        help='Path to output trained classifier model')
    parser.add_argument('--is-train', action='store_true', dest='is_train', default=False,
                        help='Flag to determine if train or evaluate')

    args = parser.parse_args()

    main(input_directory=args.input_dir, model_path=args.model_path, classifier_output_path=args.classifier_path,
         batch_size=args.batch_size, num_threads=args.num_threads, num_epochs=args.num_epochs,
         min_images_per_labels=args.min_images_per_class, split_ratio=args.split_ratio, is_train=args.is_train)
train_classifier.py
docker run -v $PWD:/medium-facenet-tutorial \
-e PYTHONPATH=$PYTHONPATH:/medium-facenet-tutorial \
-it colemurray/medium-facenet-tutorial \
python3 /medium-facenet-tutorial/medium_facenet_tutorial/train_classifier.py \
--input-dir /medium-facenet-tutorial/output/intermediate \
--model-path /medium-facenet-tutorial/etc/20170511-185253/20170511-185253.pb \
--classifier-path /medium-facenet-tutorial/output/classifier.pkl \
--num-threads 16 \
--num-epochs 25 \
--min-num-images-per-class 10 \
--is-train

# ~16 mins to complete on MBP
Evaluating the Results
Now that you’ve trained the classifier, you’ll feed it new images it has not trained on. You’ll remove the is_train flag from the previous command to evaluate your results.
docker run -v $PWD:/$(basename $PWD) \
-e PYTHONPATH=$PYTHONPATH:/medium-facenet-tutorial \
-it colemurray/medium-facenet-tutorial \
python3 /medium-facenet-tutorial/medium_facenet_tutorial/train_classifier.py \
--input-dir /medium-facenet-tutorial/output/intermediate \
--model-path /medium-facenet-tutorial/etc/20170511-185253/20170511-185253.pb \
--classifier-path /medium-facenet-tutorial/output/classifier.pkl \
--num-threads 16 \
--num-epochs 5 \
--min-num-images-per-class 10
After inference is on each image is complete, you’ll see results printed to console. At 5 epochs, you’ll see ~85.0% accuracy. Training @ 25 epochs gave results:

Conclusion
In this tutorial, you learned about the history of machine learning and how to implement a state of the art pipeline. You utilized docker to manage your library dependencies, offering a consistent environment that is platform agnostic. You used Dlib for preprocessing and Tensorflow + Scikit-learn for training a classifier capable of predicting an identity based on an image.
Complete Code Here:
ColeMurray/medium-facenet-tutorialNext Steps:
- Test on your own dataset!
- Experiment with different hyper parameters
- Train on other labels such as gender or age
- Implement a clustering algorithm to group similar faces
Call to Action:
If you enjoyed this tutorial, follow and recommend!
Interested in learning more about Deep Learning / Machine Learning? Check out my other tutorials:
- Deep Learning CNN’s in Tensorflow with GPUs
- Deep Learning with Keras on Google Compute Engine
- Recommendation Systems with Apache Spark on Google Compute Engine
Other places you can find me:
- Twitter: https://twitter.com/_ColeMurray